手把手教你用 Dify 本地部署 AI 助手并嵌入网站
你是否也想拥有一个专属的 AI 助手,并将其无缝集成到自己的网站中?Dify 作为一款开源、功能强大的 AI 应用开发平台,支持本地化部署和可视化编排,让你无需依赖公有云服务也能打造私有智能助手。本文将手把手带你完成 Dify 的本地环境搭建、AI 助手配置,并详细演示如何将它嵌入网站前端,实现与用户的实时交互。
一、部署 Docker 环境并拉取 Dify 项目
在开始之前,请确保你已经在本地成功安装了 Docker 环境。如果你还没有部署,可以参考我之前的文章:
步骤 1:克隆 Dify 源码
git clone https://github.com/langgenius/dify.git
cd dify
cd docker
步骤 2:复制环境变量文件
cp .env.example .env
可以根据需要修改 .env 文件中的一些配置,例如服务端口、数据库密码等。
步骤 3:启动 Dify 服务
docker compose up -d
等待容器构建与启动完成后,Dify 服务将在本地运行。
二、访问 Dify 并创建 ChatFlow 应用
在浏览器中访问:
http://localhost
按照页面引导注册账号并登录后台系统。
步骤 4:创建一个新的 Chat App
点击【创建空白应用】,进入应用【聊天助手】创建界面;
设置应用名称、描述等信息;
配置提示词(Prompt)与模型参数和知识库;
保存应用并点击【发布(Publish)】。
此时你的 AI 应用就成功创建并上线了。
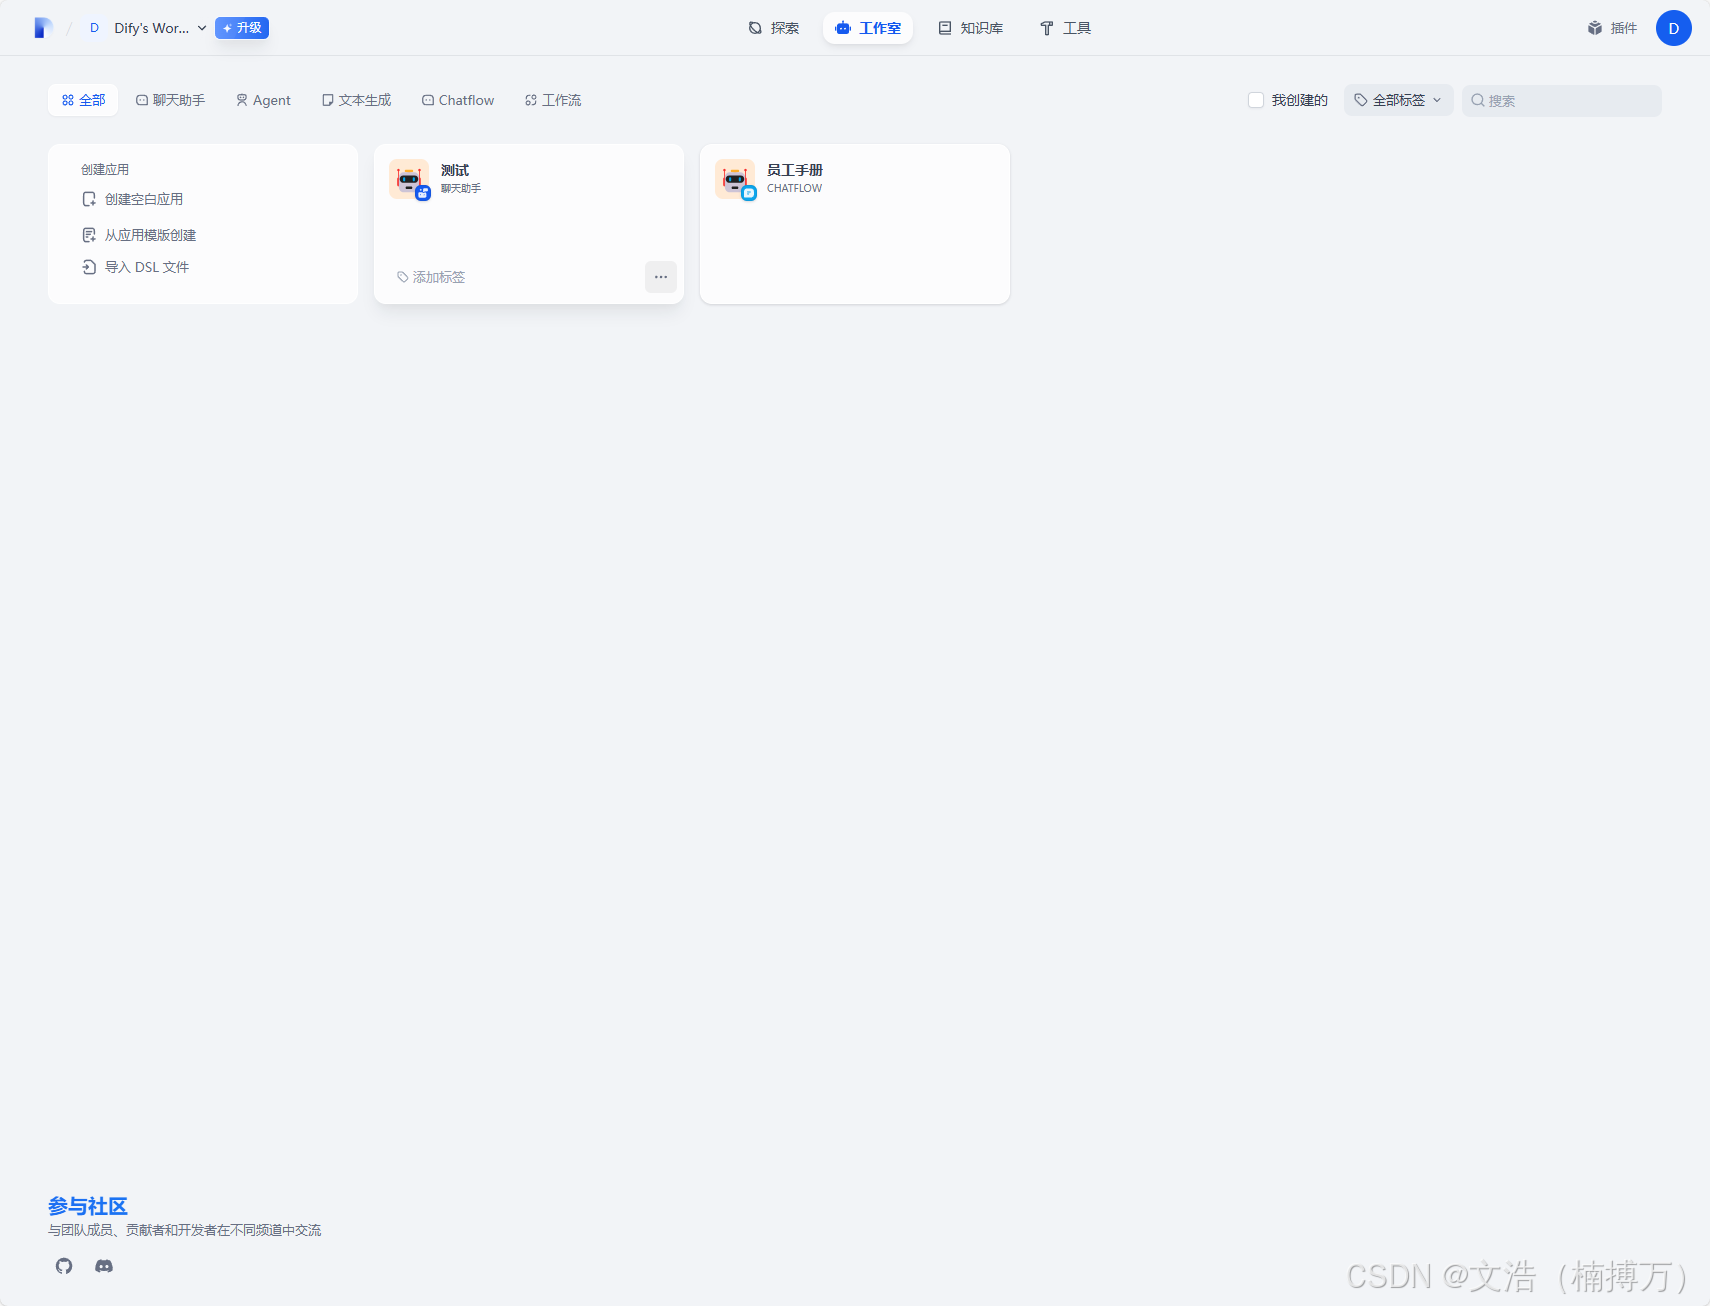
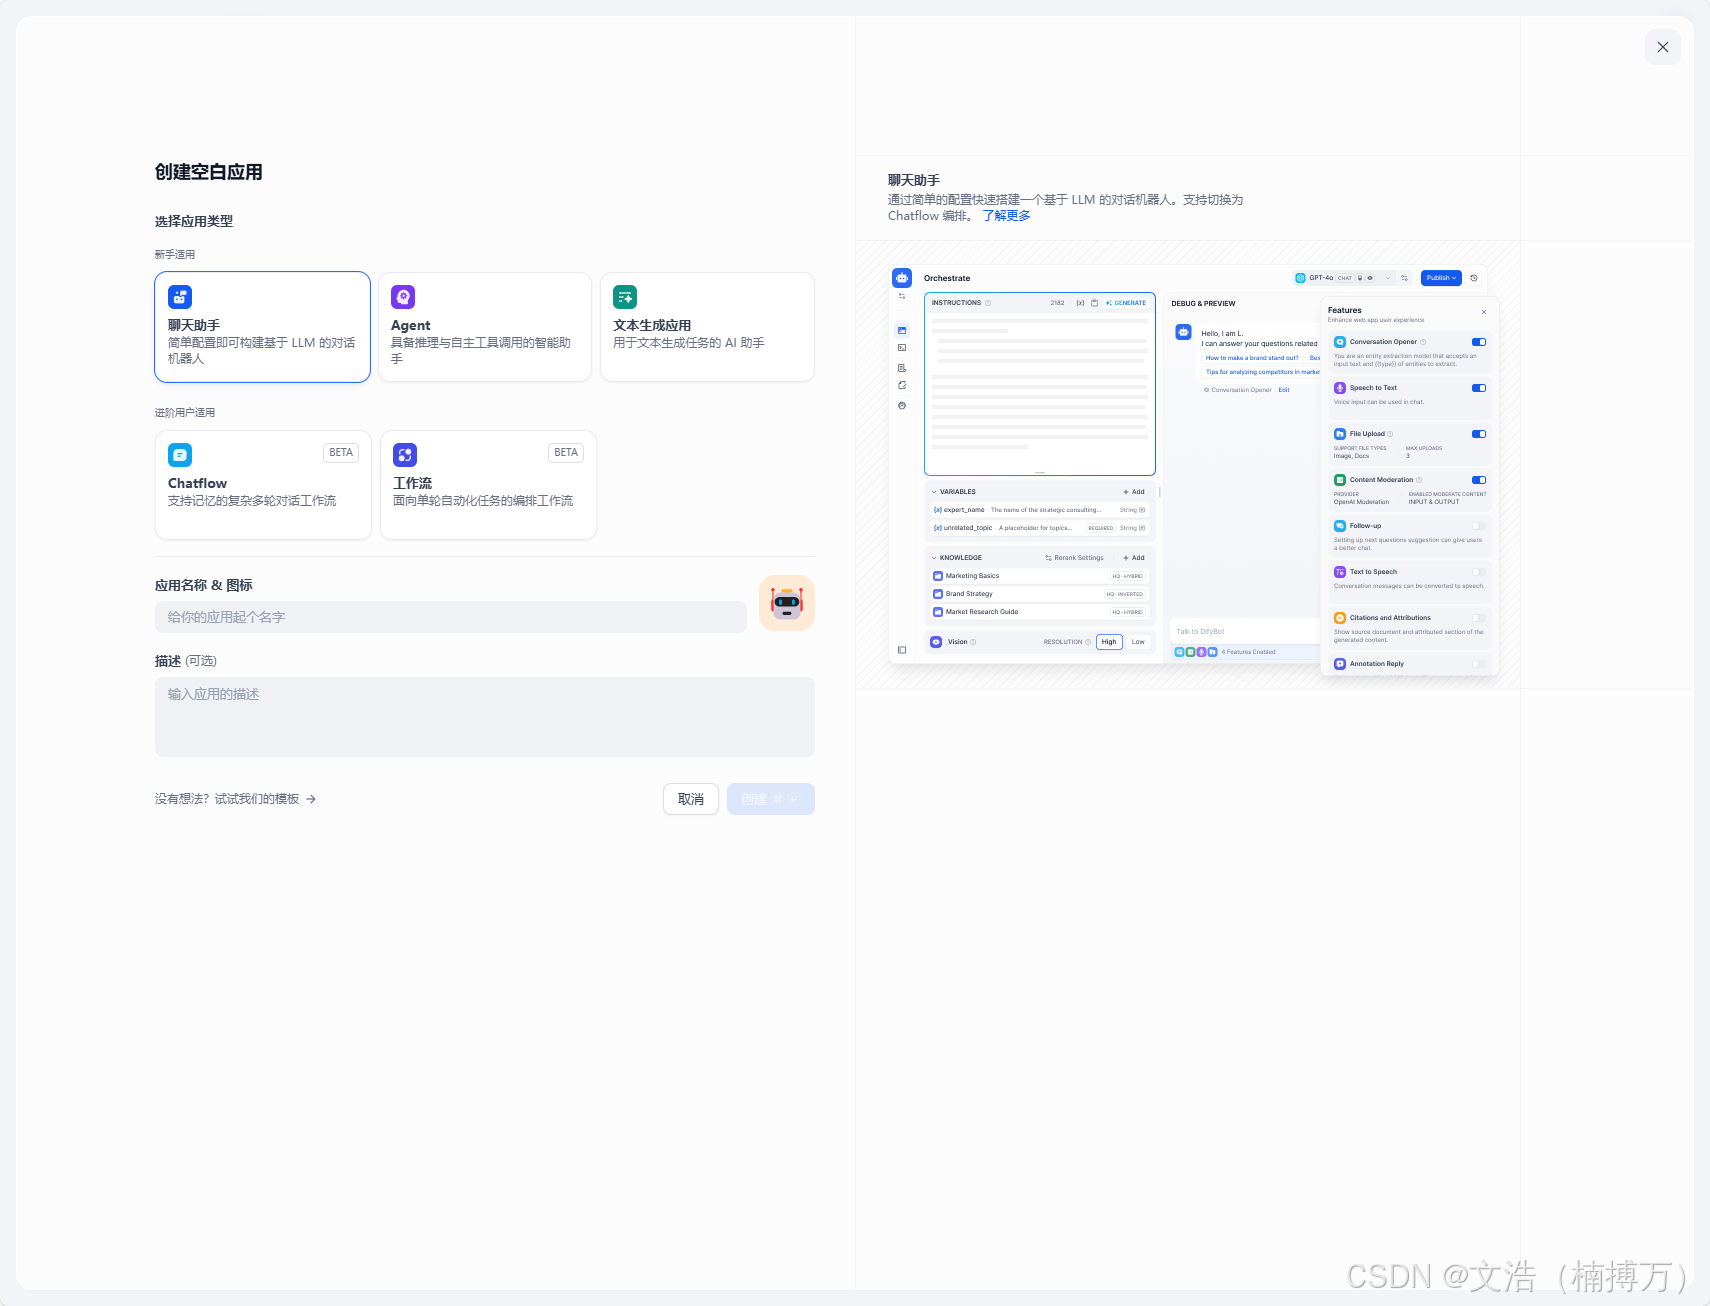
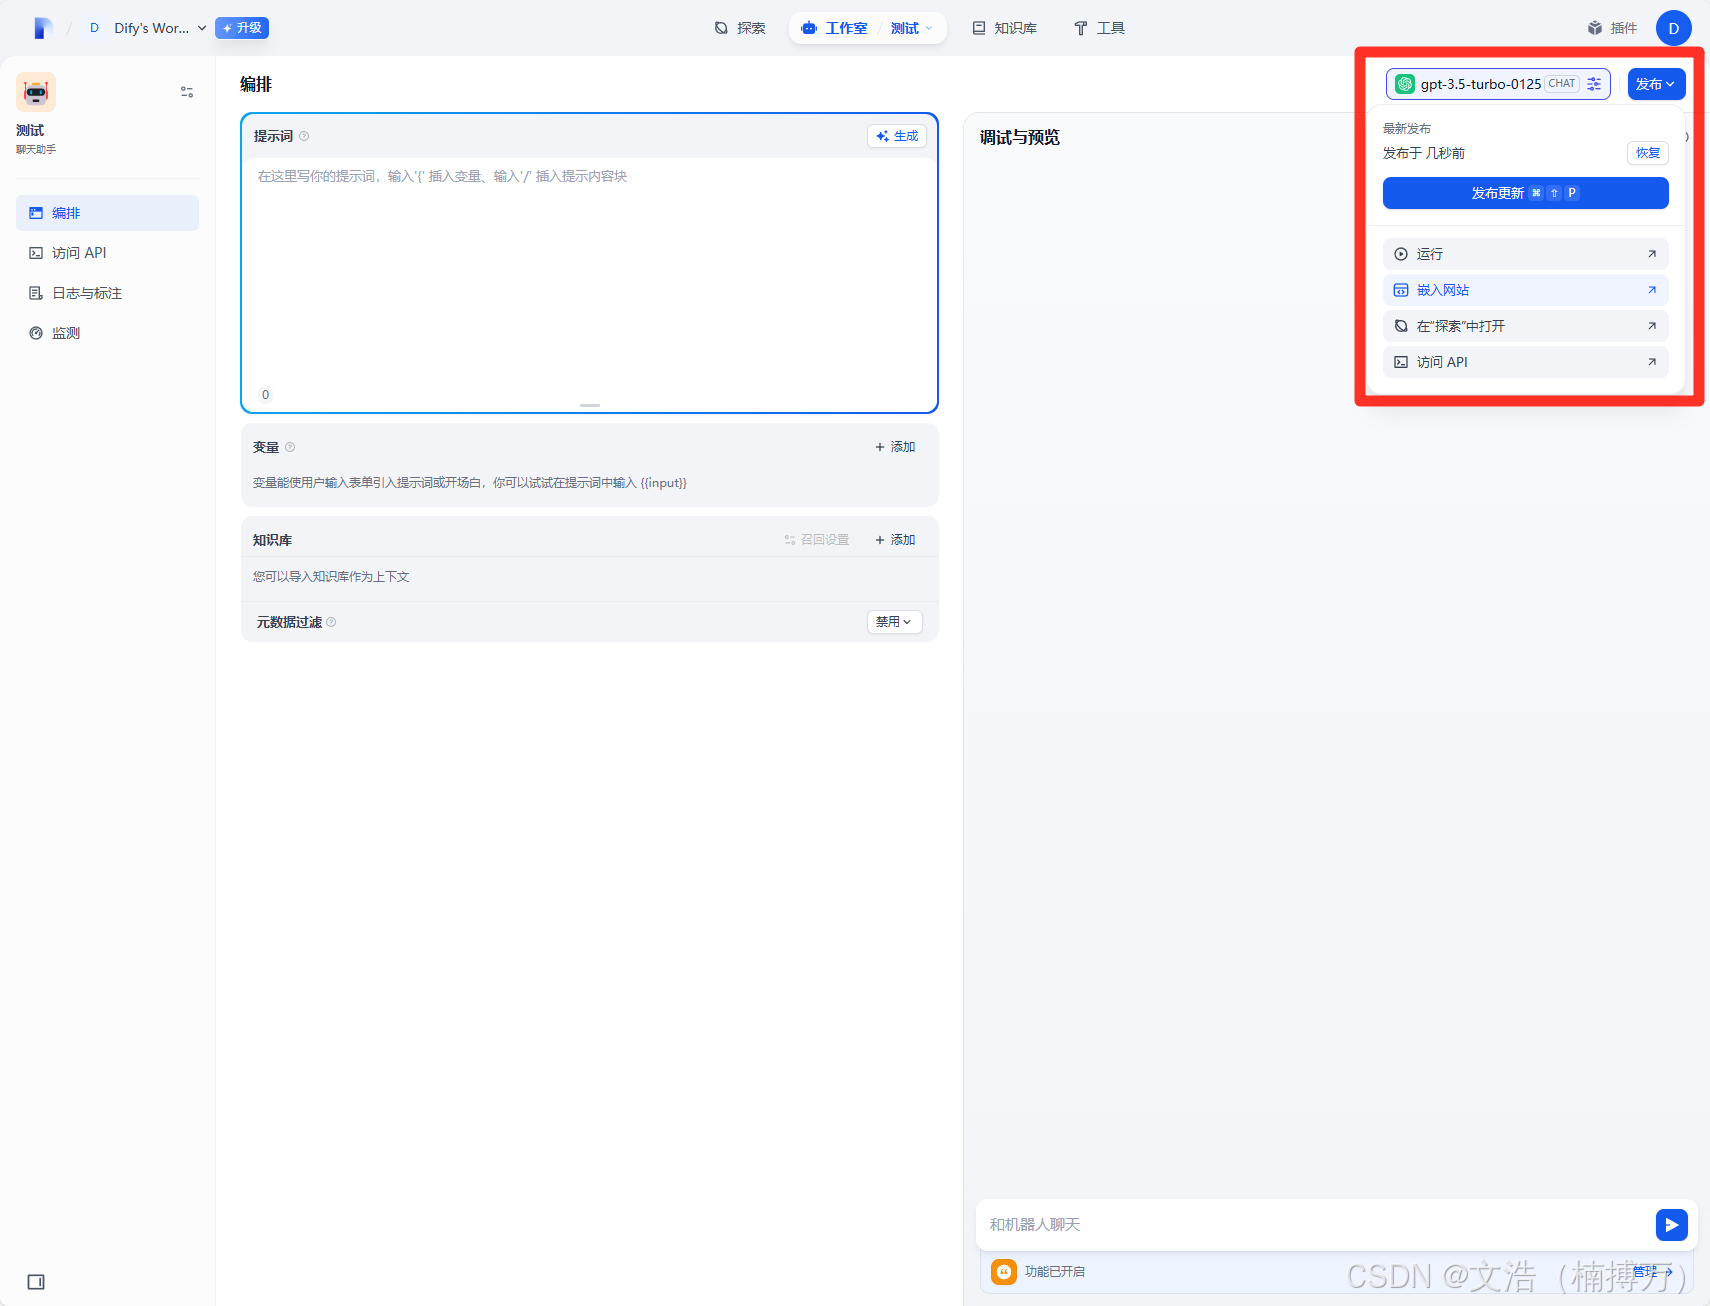
三、获取嵌入代码
进入你刚刚创建的 Chat App 页面,点击右上角【嵌入(Embed)】,Dify 会自动生成嵌入 HTML 页面的脚本代码。
如下所示(示例 token 仅作参考):
<script>
    window.difyChatbotConfig = {
        token: '3KkQvYTNzkfeYwKv',
        baseUrl: 'http://localhost'
    }
</script>
<script
        src="http://localhost/embed.min.js"

        defer>
</script>
<style>
    #dify-chatbot-bubble-button {
        background-color: #1C64F2 !important;
    }
    #dify-chatbot-bubble-window {
        width: 24rem !important;
        height: 40rem !important;
    }
</style>
四、嵌入门户网站页面
我们以一个典型的企业门户页面为例,如下:
<!DOCTYPE html>
<html lang="en">
<head>
<meta charset="UTF-8">
<meta name="viewport" content="width=device-width, initial-scale=1.0">
<title>企业门户</title>
<style>
/* 全局样式 */
body {
font-family: Arial, sans-serif;
margin: 0;
padding: 0;
background-color: #f4f4f4;
}
/* 导航栏样式 */
nav {
background-color: rgba(51, 51, 51, 0.9);
color: white;
padding: 15px 0;
text-align: center;
position: fixed;
top: 0;
width: 100%;
z-index: 1000;
}
nav ul {
list-style-type: none;
margin: 0;
padding: 0;
}
nav ul li {
display: inline;
margin: 0 15px;
}
nav ul li a {
color: white;
text-decoration: none;
transition: color 0.3s ease;
}
nav ul li a:hover {
color: #00aaff;
}
/* 英雄区域样式 */
.hero {
background-image: url('https://images.unsplash.com/photo-1505740420928-5e560c06d30e?ixlib=rb-4.0.3&ixid=M3wxMjA3fDB8MHxwaG90by1wYWdlfHx8fGVufDB8fHx8fA%3D%3D&auto=format&fit=crop&w=1470&q=80');
background-size: cover;
background-position: center;
height: 100vh;
display: flex;
justify-content: center;
align-items: center;
text-align: center;
color: white;
position: relative;
}
.hero::before {
content: "";
position: absolute;
top: 0;
left: 0;
width: 100%;
height: 100%;
background-color: rgba(0, 0, 0, 0.5);
}
.hero-content {
z-index: 1;
}
.hero h1 {
font-size: 48px;
margin-bottom: 20px;
}
.hero p {
font-size: 24px;
margin-bottom: 40px;
}
.btn {
background-color: #00aaff;
color: white;
padding: 15px 30px;
text-decoration: none;
border-radius: 5px;
transition: background-color 0.3s ease;
}
.btn:hover {
background-color: #0088cc;
}
/* 服务区域样式 */
.services {
padding: 100px 0;
text-align: center;
background-color: white;
}
.services h2 {
font-size: 36px;
margin-bottom: 20px;
}
.service {
display: inline-block;
width: 300px;
margin: 0 20px;
padding: 20px;
background-color: white;
border-radius: 5px;
box-shadow: 0 0 10px rgba(0, 0, 0, 0.1);
transition: transform 0.3s ease;
}
.service:hover {
transform: translateY(-10px);
}
.service i {
font-size: 48px;
color: #00aaff;
margin-bottom: 20px;
}
.service h3 {
font-size: 24px;
margin-bottom: 10px;
}
/* 关于我们区域样式 */
.about {
background-color: #f9f9f9;
padding: 100px 0;
text-align: center;
}
.about h2 {
font-size: 36px;
margin-bottom: 20px;
}
.about p {
font-size: 18px;
line-height: 1.6;
max-width: 800px;
margin: 0 auto;
}
/* 联系我们区域样式 */
.contact {
padding: 100px 0;
text-align: center;
background-color: white;
}
.contact h2 {
font-size: 36px;
margin-bottom: 20px;
}
.contact form {
max-width: 600px;
margin: 0 auto;
}
.contact input,
.contact textarea {
width: 100%;
padding: 15px;
margin-bottom: 20px;
border: 1px solid #ccc;
border-radius: 5px;
}
.contact button {
background-color: #00aaff;
color: white;
padding: 15px 30px;
border: none;
border-radius: 5px;
cursor: pointer;
transition: background-color 0.3s ease;
}
.contact button:hover {
background-color: #0088cc;
}
/* 页脚样式 */
footer {
background-color: #333;
color: white;
text-align: center;
padding: 20px 0;
}
</style>
</head>
<body>
<!-- 导航栏 -->
<nav>
<ul>
<li><a href="https://www.aipuzi.cn">首页</a></li>
<li><a href="https://www.aipuzi.cn">服务</a></li>
<li><a href="https://www.aipuzi.cn">关于我们</a></li>
<li><a href="https://www.aipuzi.cn">联系我们</a></li>
</ul>
</nav>
<!-- 英雄区域 -->
<div class="hero">
<div class="hero-content">
<h1>欢迎来到我们的企业门户</h1>
<p>我们致力于提供高质量的服务和解决方案</p>
<a href="https://www.aipuzi.cn" class="btn">了解更多</a>
</div>
</div>
<!-- 服务区域 -->
<div class="services">
<h2>我们的服务</h2>
<div class="service">
<i class="fas fa-code"></i>
<h3>软件开发</h3>
<p>我们拥有专业的开发团队,为您提供定制化的软件开发服务。</p>
</div>
<div class="service">
<i class="fas fa-chart-line"></i>
<h3>数据分析</h3>
<p>通过深入的数据分析,为您提供有价值的商业洞察。</p>
</div>
<div class="service">
<i class="fas fa-cloud"></i>
<h3>云计算服务</h3>
<p>提供可靠的云计算解决方案,满足您的业务需求。</p>
</div>
</div>
<!-- 关于我们区域 -->
<div class="about">
<h2>关于我们</h2>
<p>我们是一家充满创新精神的企业,专注于为客户提供高品质的产品和服务。我们的团队由一群经验丰富、充满激情的专业人士组成,致力于通过技术创新解决客户的问题。我们相信,只有不断追求卓越,才能在激烈的市场竞争中立于不败之地。</p>
</div>
<!-- 联系我们区域 -->
<div class="contact">
<h2>联系我们</h2>
<form>
<input type="text" placeholder="姓名">
<input type="email" placeholder="邮箱">
<textarea placeholder="留言"></textarea>
<button type="submit">提交</button>
</form>
</div>
<!-- 页脚 -->
<footer>
<p>© 2025 企业名称。保留所有权利。</p>
</footer>
<script>
window.difyChatbotConfig = {
token: '3KkQvYTNzkfeYwKv',
baseUrl: 'http://localhost'
}
</script>
<script
src="http://localhost/embed.min.js"
defer>
</script>
<style>
#dify-chatbot-bubble-button {
background-color: #1C64F2 !important;
}
#dify-chatbot-bubble-window {
width: 24rem !important;
height: 40rem !important;
}
</style>
</body>
</html>假设你已经有一个 index.html 文件,结构包括导航栏、服务介绍、关于我们、联系我们等模块。
只需将上述 Dify 提供的脚本嵌入到页面 <body> 标签的末尾即可:
<!-- 页脚 -->
<footer>
<p>© 2025 企业名称。保留所有权利。</p>
</footer>
<!-- 嵌入 Dify 智能助手 -->
<script>
window.difyChatbotConfig = {
token: '3KkQvYTNzkfeYwKv',
baseUrl: 'http://localhost'
}
</script>
<script
src="http://localhost/embed.min.js"
defer>
</script>
<style>
#dify-chatbot-bubble-button {
background-color: #1C64F2 !important;
}
#dify-chatbot-bubble-window {
width: 24rem !important;
height: 40rem !important;
}
</style>刷新页面后,右下角会自动出现一个气泡按钮,点击即可唤出 AI 聊天助手,进行交互。
五、本地部署带来的优势
数据私有化:不依赖第三方平台,敏感数据安全可控;
定制能力强:Prompt 和模型自由组合,适应不同业务场景;
界面嵌入简单:几行代码即可嵌入任何网页;
开源生态支持:活跃社区支持持续升级。
六、注意事项
默认访问地址为 http://localhost,如需远程访问请配置公网地址或使用 Nginx 反向代理;
若模型调用失败,请检查 API Key 或 OpenAI 模型服务是否配置正确;
七、成品展示
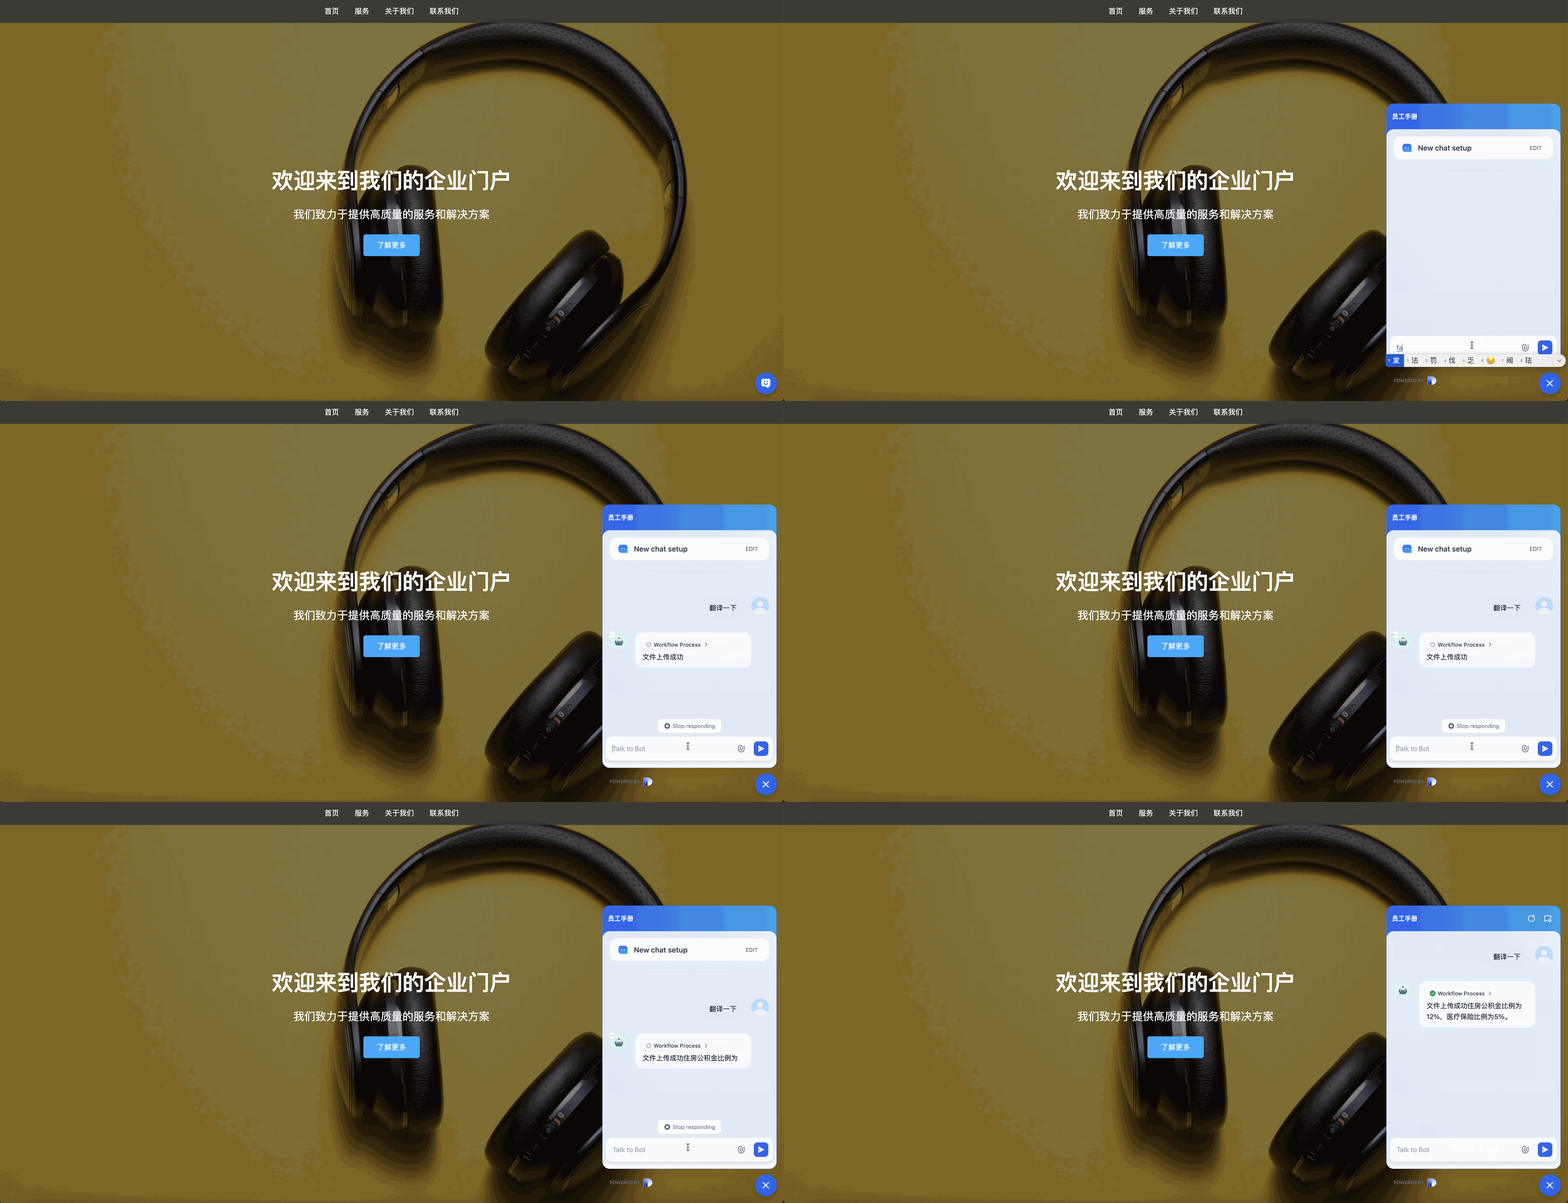
通过上述内容,你就已经基本理解了这个方法,基础用法我也都有展示。如果你能融会贯通,我相信你会很强
Best
Wenhao (楠博万)
总结
通过本教程,你已经掌握了从零开始在本地部署 Dify、创建个性化 AI 助手,以及通过 API 或嵌入式组件将其接入网站的完整流程。整个过程安全可控、可定制性强,非常适合企业内部知识库问答系统、个人项目助手或客户服务平台的构建。现在,只需几步操作,你就能让 AI 真正为你的应用赋能!
版权及免责申明:本文来源于#文浩(楠搏万),由@AI工具箱整理发布。如若内容造成侵权/违法违规/事实不符,请联系本站客服处理!该文章观点仅代表作者本人,不代表本站立场。本站不承担相关法律责任。
如若转载,请注明出处:https://www.aipuzi.cn/ai-tutorial/178.html


